2014년 12월 4일 목요일

ARCH 655_Project2_Jungmin_Kim

I finished roof structural design with parametric method on Project 1.
This project has general steps. First, I made plane mesh using  rhino with grasshopper. After then, using kangaroo plug-in with U-force (direction to Z),
I can get curved mesh. Second, checked grid lines, it need to find the highest line because this line is more curved then others. It muse be calculated central line. Important thing is here, because of creating curved mesh. Third step is using a move battery making 3 more lines. These 3 lines can make a loft into surface. Next, using series battery, we can copy the surface and rotate it. Divide battery helps easily apply to pattern. So after dividing, apply to pattern with morph batter. Another surface takes same way, too. But, it is simple way to figure out original model.  In the Project 2, I tried to apply general way for making overlapped roof with geometry pattern. If I choose way of voronoi, I can make similar roof design with out pattern morph. Also, in this project 2, I can try more unusual shape of roof into the Lourve Abu Dhabi Museum.


example of voronoi (sourced by google)


Step 9. Study Voronoi Algorithm
I study a voronoi component into surface. 


First, set randomly placing points to point component.


And then, Voronoi  component need boundary. I didn't choose just rectangular box.
In my case, I gave box with two edge point. I could control the box size.


After then, give to offset for thickness. Also, it need to extrude to Voronoi pattern.


Last step is just capped it. After that, we can see voronoi pattern.


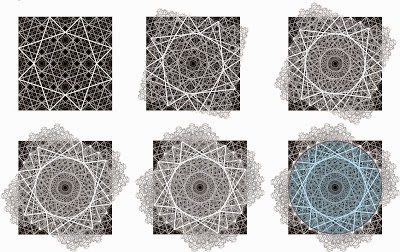
Step 10. Improve Project 1 with Voronoi
I tried to regenerate project 1, roof of the Louvre Abu Dhabi Museum.

Open existed surface from project 1.


Give multiple points with voronoi component. This process, we don't need boundary.
Just get the pattern.


I used geometry with morph component. But, this case, I could use project  component. I chose voronoi pattern with z direction to surface.


Final step is same with project 1. Got the round surface with voronoi pattern.


Step 11. Other Case Study of Algorithm Effect with Curved Surface


- United Kingdom Pavilion at Shanghai Expo, 2010

I visited Shanghai Expo 2010, I saw UK Pavilion. It is beautiful and interesting building to me. In addition, this building used curved surface, too. 
My project 1 is used carved roof. But, this case is that each element, which is a acrylic pole, follow curved surface. So, I research again it and tried with grasshopper.

First, make mesh from rhino. And explode it. Each mesh apply to surface component.


Give a UV grid. This step also we already learned from class.


Check surface preview and give to divide and to subtract surface.


Offset to outside for making ending points.


Scale and Area components help to find central points.


 Original surface also need to explode central points.


Using List item component, we can get poles from original surface to offset surface.


Apply to other meshes.


Rendering Image


Rendering Image 2


Project Movie


2014년 11월 3일 월요일

ARCH 655_Project1_Jungmin_Kim


Step 0. Case Study

I choose that the Louvre Abu Dhabi Museum, designed by Ateliers Jean Nouvel.
This project aims at creating a welcoming world which associates lights and shadows as well as shimmers and calm places in a serene atmosphere.

Courtesy of Ateliers Jean Nouvel
The project is based on one of the major symbols of Arabic architecture: the Cupola. But here, it is a modern proposal made evident by its obvious gap with tradition. The dome is doubled and flat with a 180-meter diameter, offering a perfect luminous geometry drilled in a more random weaved material which creates a shadow punctuated with sun bursts. It shines in the sun of Abu Dhabi. At night, the protected landscape turns into a haven of light under a star-spangled cupola.
(text by Jean Nouvel)


Step 1. Let's start design with rhino & grasshopper.
Made plane mesh using rhino. Then, you can apply to mesh.
Using kangaroo plug-in with U-force (direction to Z),
You can get curved mesh. (preview)


Step 2. After first step, you can see grid lines. We need to find the highest line because it is more curved than others. 
Important thing is here. I did not create circle mesh. So, I need to calculate central points for taking the line. I gave 11 X 11 grid. You can find point like me.


Step 3. After figuring central line, using move battery, make 3 more lines.
These lines can make a loft into surface. 


Step 4. Using series battery, copy the surface and rotate it. 
You should use same center point in all step.


Step 5. Divide battery helps easily apply to pattern.
I choose an octagon pattern. So, after dividing, apply to pattern with morph battery.
Another surface takes same way, too. 


Step 6. Create new circle surface and extrude it. After then, split all with cylinder.


Step 6. If you finish all step, use bake for making surface to rhino.
And analysis and rendering whatever.


Step 7. Analysis using curvature and zebra.

 curvature analysis
 maximum
 zebra horizontal
zebra vertical


Step 8. I was rendered and retouched this image.


Project Movie.